

Introduction #
On 27 October 2026, NSM (the Norwegian National Security Authority) raised the national cyber risk level to HØYT and published a list of measures it wants organisations to put in place. Many of them come straight from the NSM ICT Security Principles (in Norwegian: Grunnprinsipper for IKT-sikkerhet 2.1): 118 measures in 21 principles, each with a suggested priority, grouped under identify, protect and maintain, detect, and respond and recover.
Why NSM’s principles #
I like working with NSM’s principles, and not only because NSM is the authority Norwegian organisations answer to:
- Plain language. NSM has done a great job of writing the measures so that people outside the security team understand them. That matters when the owners are in IT operations, procurement and management.
- In English too. Version 2.1 is the first to be translated to English, so the principles also work for international teams and suppliers.
- Built on experience. NSM bases them on its own experience and feedback from public and private organisations.
- Connected to what you already use. Every measure is mapped to ISO/IEC 27002:2022, and NSM lists frameworks to use together with them: ISO/IEC 27001, the CIS Critical Security Controls, the UK NCSC’s Cyber Essentials and Cyber Assessment Framework, the NIST Cybersecurity Framework and SP 800-53, and Australia’s ISM. Several of those already exist as Maester tests or Azure Policy initiatives, which is why combining them works.
From principle to proof #
The principles are good. What they don’t tell you is how a measure like 2.6.5, “minimise privileges for management accounts”, looks in an Entra ID tenant, how you know you’re compliant today, or whether you still are next month. Here’s that one measure, followed all the way from NSM’s text to a decision:
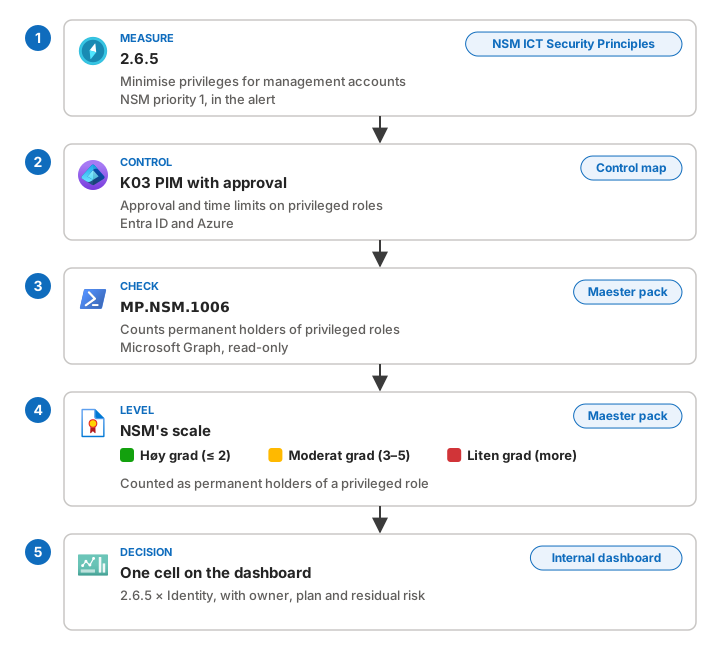
So the question I wanted to answer is: could this be a way for an organisation to track the NSM ICT Security Principles? Turn the principles into controls it owns, measure the controls automatically where it can, and report the result on the scale NSM already uses. I built a proof of concept with the three parts you see under the strip above:
- A control map: each NSM measure mapped to the Microsoft control that implements it, per platform.
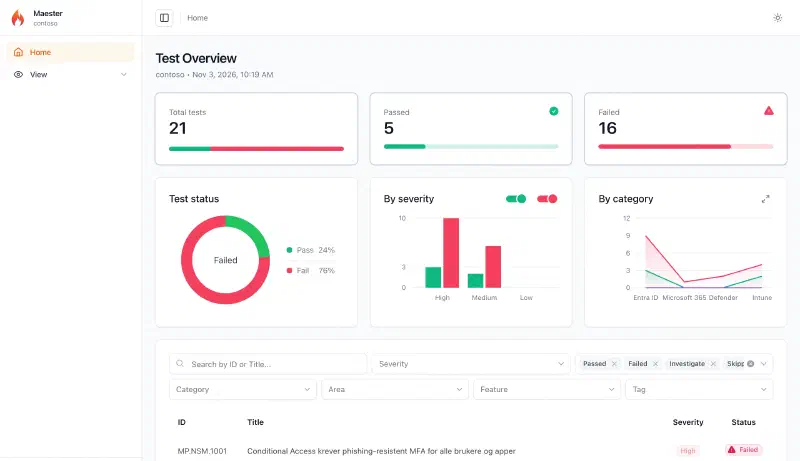
- A Maester pack: 21 read-only checks against Microsoft Graph that score Entra ID, Microsoft 365 and Intune on NSM’s own scale. I built it with help from Claude Opus 5.5, based on Maester’s documentation and adjusted to NSM, with the control map as the specification.
- An internal dashboard that combines Maester’s results with the control map and shows status per measure and platform.
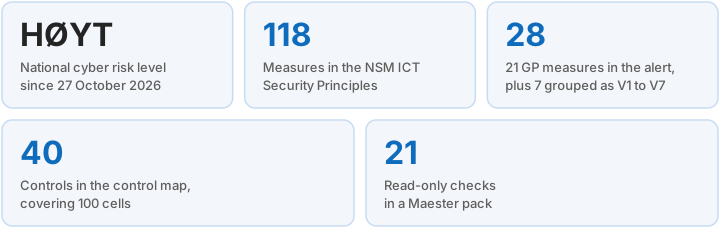
The proof of concept in numbers:
Note: This is a proof of concept, not a product. I haven’t published the pack to Maester Packs, and the dashboard is internal, so I won’t show it here. The goal is to show how it can be done, so other organisations can combine the tools they already have with the framework they answer to.
Scope: the control map and the pack cover the 28 measures in NSM’s alert, not all 118. The other 90 are next, with the same method. See What’s next.
Why I built this #
I want to help organisations become more secure, not just more compliant. I work Zero Trust first, and as a CISSP I care about whether confidentiality, integrity and availability actually hold up. Verify explicitly, use least privilege access and assume breach work just as well for a framework as for a tenant: don’t just assess it once, measure it.
The inspiration came from the Zero Trust Assessment that Merill Fernando and the team at Microsoft build, and which we use with customers all the time. Maester 3.0 ships it as a pack. If a Zero Trust assessment can be a pack, so can NSM’s principles.
Why this matters beyond the tenant #
Most of this post is hands-on, but the question behind it belongs to everyone who owns or oversees the risk: the CISO and CTO, management and the board, risk and compliance, and internal audit. That question is how secure are we against the framework we’re measured on, and how do we know? I look at that security first, through the oldest lens in our field: the CIA triad. NSM’s measures map onto it naturally:
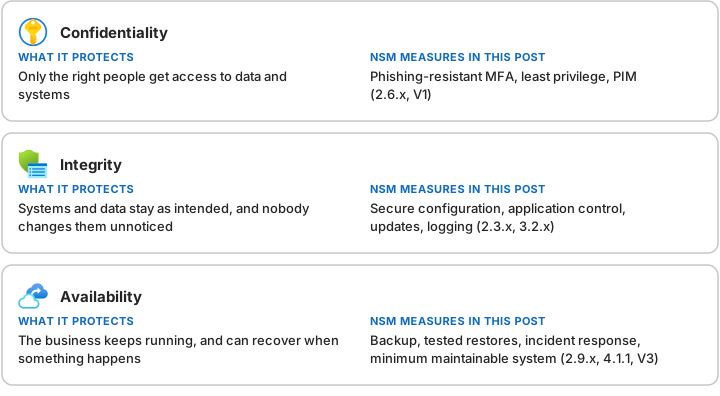
For them, that gives three things a yearly assessment on its own doesn’t:
- A current picture, not a yearly snapshot. Controls are measured every week, so drift shows up before the next audit does.
- Honest coverage. You can see what’s measured, what’s attested by an owner, and what nobody has assessed yet.
- Decisions on the right level. Residual risk is signed off per NSM measure, on NSM’s own scale, by the people who own the risk.
I love trail running, and the longer I work with security, the more alike they look. New shoes don’t get you to the finish. You need a map of the route, a watch that tells you where you actually are, and a plan for when the weather turns. NSM’s principles are the route. The control map shows where each measure is on it, the checks are the watch, and the work in progress is the plan. Without the watch, you only find out you’re off course when you’re already lost.
How it fits together #
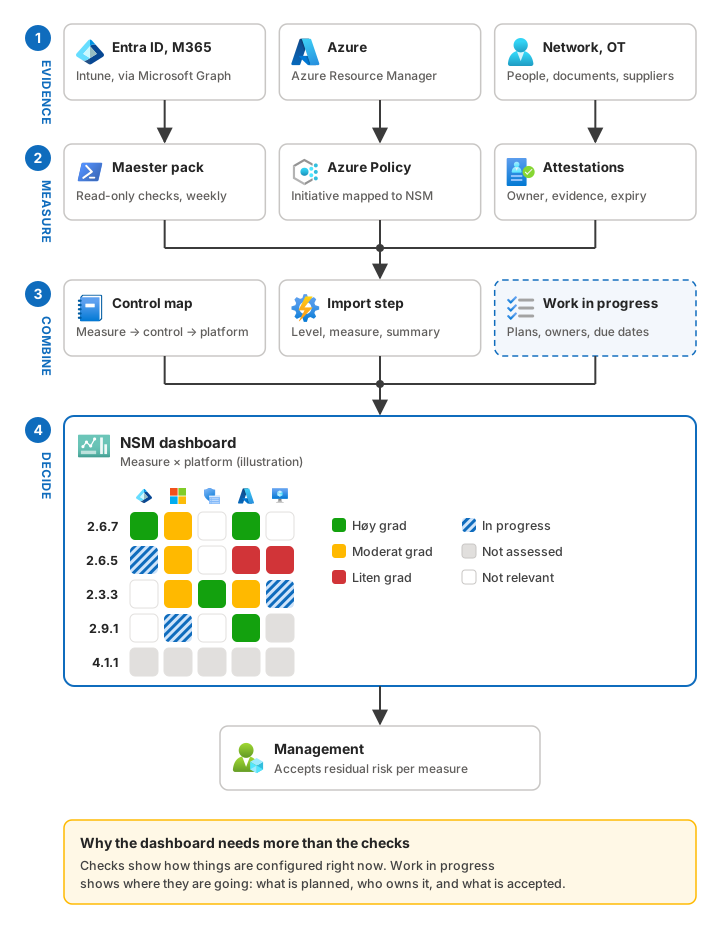
Read it from top to bottom: evidence, measure, combine, decide. Where an API can answer, a Maester pack or Azure Policy checks it. Where it can’t, an owner attests, with evidence and an expiry date.
The point is the shape, not the tooling. Every source ends up as the same thing: a measure, a platform, an NSM level and a short reason. Once you have that, the view on top is the easy part.
What the checks can’t see #
Technical checks are honest, but they only see the configuration as it is right now. They don’t know that phishing-resistant MFA is being rolled out to admins this month, that a migration has a firewall rule open until Friday, or that management accepted a gap until a supplier delivers. Seen through the checks alone, a measure that’s being fixed looks exactly like one that’s been forgotten.
That’s why the internal NSM dashboard combines the checks with the control map and a register of work in progress: the plan, the owner, the due date, and any exception or accepted risk. A cell can then be red and in progress, with a name and a date on it. That’s the difference between measuring a tenant and being in control of it.
Start with NSM’s own method #
NSM already publishes a method for risk assessment of ICT systems, with a spreadsheet template. Each measure is scored as høy grad (high degree), moderat grad (moderate degree) or liten grad (low degree), plus “not relevant” and “not assessed”. I kept that scale everywhere instead of inventing a new one. A manager who has seen NSM’s template recognises the result, and the residual risk can be signed off on the same terms.
I’ve worked with organisations that use NSM’s spreadsheet, and it’s very good at what it’s made for: an interview-based assessment, where the right people sit down together and go through the measures one by one, or an audit-style review at a point in time. This approach doesn’t replace that. It’s for the time in between: putting the controls in place before the audit, and keeping them aligned with the framework afterwards. The spreadsheet tells you where you stood on the day of the review. The measured controls tell you whether you still do.
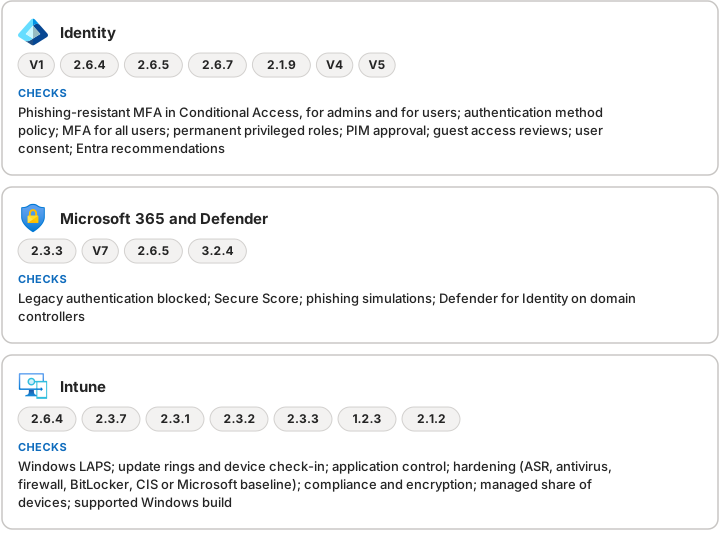
I also split the assessment by platform domain: Identity, Endpoint, Microsoft 365, Azure, On-prem, Network, OT and Organisation. The same measure is solved differently on each one.
The control map #
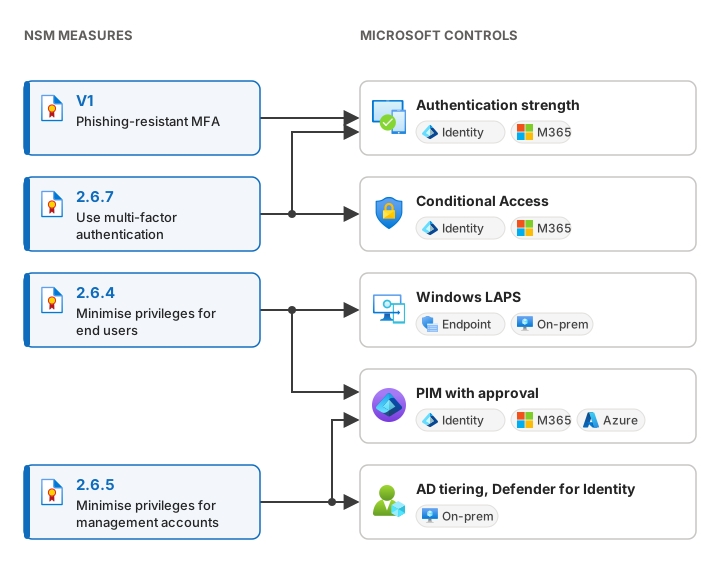
Take 2.6.5, “minimise privileges for management accounts”. In Entra ID that means Privileged Identity Management with approval. On-prem it means AD tiering and Defender for Identity. In Azure it’s PIM again, but for Azure roles.
Behind those controls sits a design decision, not a setting. Microsoft’s Enterprise Access Model, which builds on the classic AD tier model, separates the control plane, the management plane and the data/workload plane, and Microsoft’s privileged access guidance adds privileged access workstations on top. If the organisation has decided where its planes go and which accounts may cross them, 2.6.5 has something to be measured against. If it hasn’t, PIM only makes standing access temporary, not smaller.
And one control often covers several measures: PIM covers both 2.6.4 and 2.6.5.
I described each control once, with the measures and domains it covers:
{ "id": "K03", "name": "Privileged Identity Management med godkjenning og tidsbegrensning",
  "tool": "Entra ID", "how": "auto", "source": "Entra PIM: permanente rolletildelinger",
  "map": { "2.6.4": ["id", "m365"], "2.6.5": ["id", "az"] } }
40 controls cover all 100 relevant measure-and-platform cells for the measures in NSM’s alert. The build fails if a relevant cell has no control, so gaps can’t hide. For the organisation, this map is the most valuable artefact in the whole project: it gives every measure an owner, a tool and a way to check it, per platform.
An overview of the mapping #
Here’s the identity slice of the map. Four measures, five controls, and the platforms each control covers:
And the whole map, grouped by NSM principle, for the 28 measures in NSM’s alert:
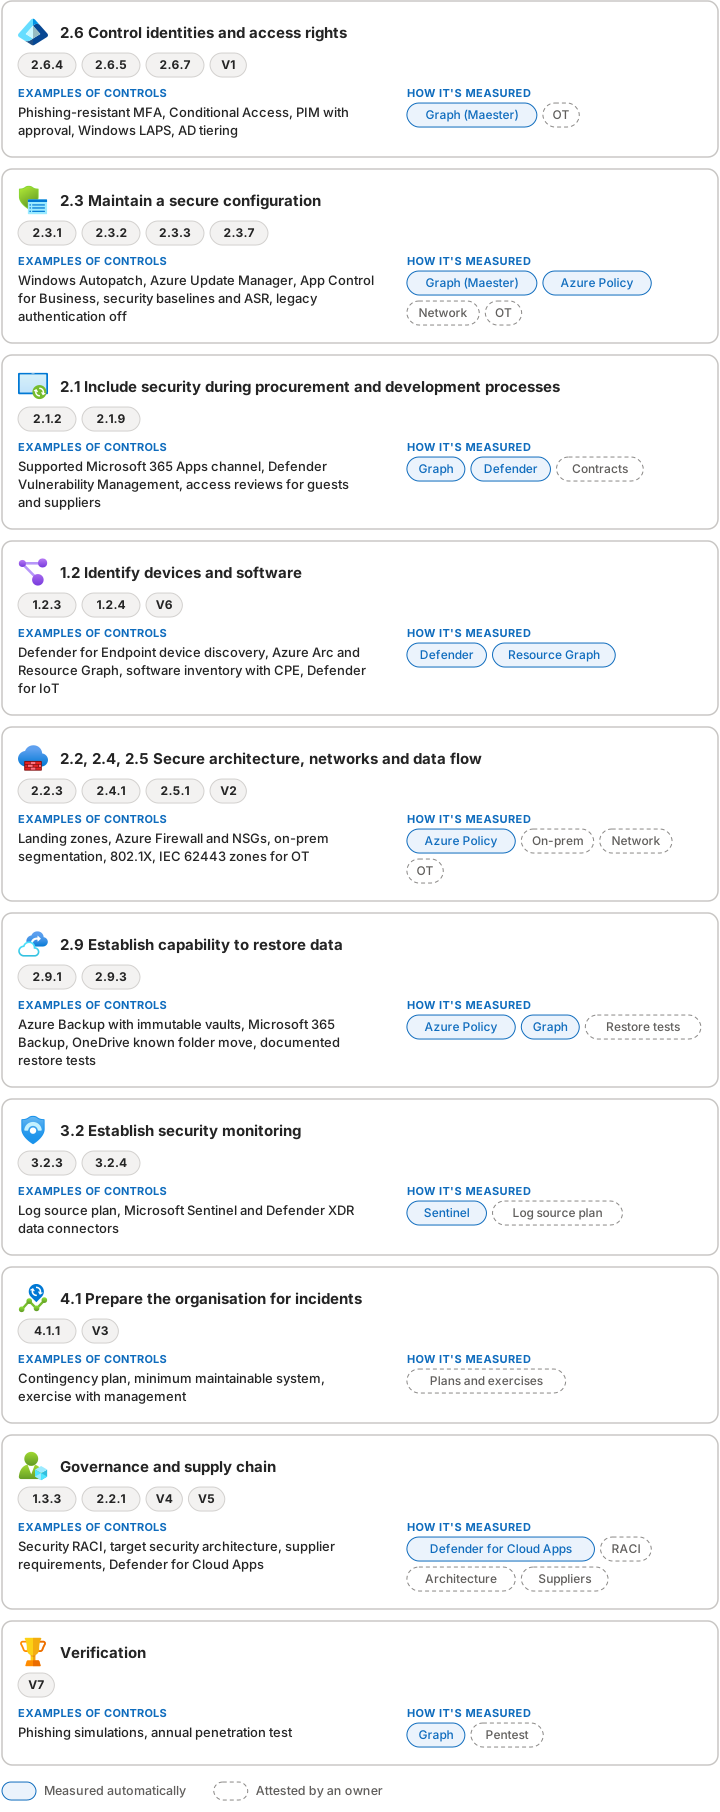
Of the 40 controls, 26 can be read from a Microsoft API or Azure Policy. The other 14 are network, OT and governance controls that need an attestation. That split is useful on its own: it tells you up front how much of the NSM work can be automated, and where you need people.
Measuring it with a Maester pack #
Maester is an open-source test framework for Microsoft 365 security, built on PowerShell and
Microsoft Graph. Version 3.0 (in preview when I wrote this) adds packs: a folder of tests with a manifest, which
Maester checks and pins when you install it, and runs next to its own tests when you ask for it with -Pack. The
Zero Trust Assessment ships as one (Get-MtPack lists it as maester.zero-trust-assessment, code ZTA). The
Australian Essential Eight and ISM checks ship as a built-in suite that uses the same framework mechanism, so a
national framework fits naturally.
The community has started publishing packs too. On Maester Packs I can already see two CIS packs for the CIS Microsoft Intune for Windows 11 Benchmark (Level 1 and BitLocker), published on 4 November 2026, the day before this post. It’s early days, but it shows where this is going: frameworks as packs that anyone can install next to Maester’s own tests.
Here’s the life of a pack, from the first scaffold to the report:
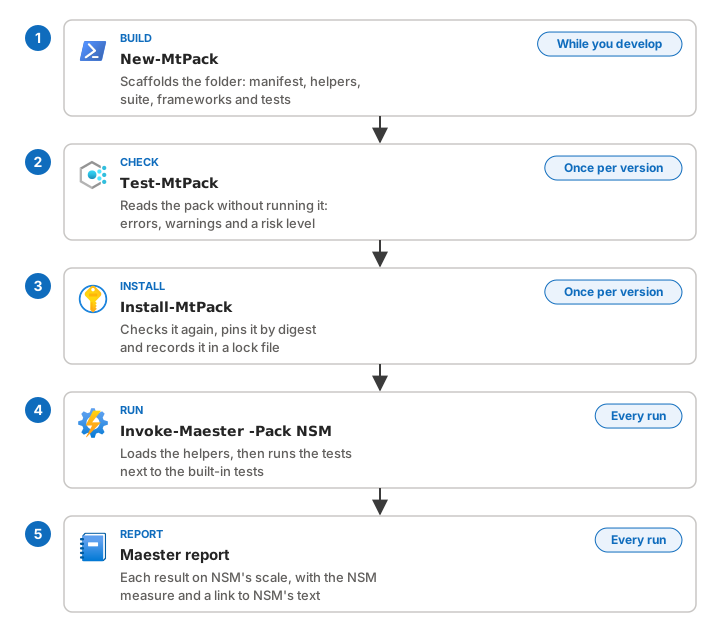
New-MtPack scaffolds the pack:
Import-Module Maester -RequiredVersion 3.0.0
New-MtPack -Path ./packs/nsm-gp-ikt -Id contoso.nsm-gp-ikt -Code NSM -Name 'NSM grunnprinsipper for IKT-sikkerhet 2.1'
The pack ID is <publisher>.<pack>, so replace contoso with your own organisation’s name.
What’s in a pack #
A pack is just a folder. This is the whole NSM pack:
nsm-gp-ikt/
├── maester-pack.json            # the manifest
├── helpers/
│   └── NsmHelpers.ps1           # shared functions: NSM level, break-glass accounts, privileged roles
└── tests/
    ├── suite.json               # the suite, and the frameworks it reports against
    ├── frameworks/
    │   ├── nsm-gp-ikt.json      # all 118 measures, generated from NSM's spreadsheet
    │   └── nsm-varsel-2026.json # V1 to V7 from the alert
    ├── Test.MP.NSM.1006.ps1     # one file per test: the check itself
    └── Test.MP.NSM.1006.md      # and its documentation: why, NSM's levels, how to fix it, links
The manifest tells Maester what the pack is and, just as important, what it touches:
{
  "Id": "contoso.nsm-gp-ikt",
  "Name": "NSM grunnprinsipper for IKT-sikkerhet 2.1",
  "Version": "0.1.0",
  "RequiresMaester": ">=3.0",
  "Code": "NSM",
  "Suites": ["tests"],
  "Helpers": ["helpers"],
  "Uses": {
    "Services": ["Graph"],
    "GraphScopes": ["<the read-only scopes your tests need>"],
    "Network": [],
    "Modules": [],
    "TenantWrites": []
  }
}
Here’s how the pieces work together when Maester runs the pack:
Codegives every test its prefix, so the IDs areMP.NSM.1001,MP.NSM.1002and so on, and you can run the pack on its own withInvoke-Maester -Pack NSM -SkipBuiltIn.Helpersare loaded before the tests, so shared logic, such as turning a count into høy, moderat or liten grad, lives in one place.Suitespoint to the folders with tests. Each suite declares the frameworks it reports against, and each test points at the requirements it covers. That’s how a test ends up next to NSM’s measure in the report.Usesdeclares the services, Graph scopes, network calls, modules and tenant writes the pack needs.Test-MtPackchecks the declared network calls, modules and tenant writes against the code, shows the Graph scopes to whoever installs the pack, and flags write scopes as high risk. An emptyTenantWritesmeans the pack may not write to the tenant.- The
.mdnext to each test is the text you see in Maester’s report. Maester puts the result where the file says%TestResult%.
If you’ve written a Maester test before, nothing here is new. The pack just bundles the tests with their framework and a declaration of what they need.
NSM as a framework #
A suite can declare frameworks. I generate two framework files from NSM’s spreadsheet: all 118 GP-IKT measures, and the extra recommendations in the alert that have no GP number. NSM doesn’t number those, so I grouped them as V1 to V7 (V1 is phishing-resistant MFA).
{
  "Id": "NSM.NsmGpIkt",
  "Name": "NSM grunnprinsipper for IKT-sikkerhet 2.1",
  "Frameworks": [
    { "Key": "nsm-gp-ikt", "Version": "2.1" },
    { "Key": "nsm-varsel-2026", "Version": "2026-10-27" }
  ]
}
Each requirement carries NSM’s title, category, priority, a direct link to the measure on nsm.no, and NSM’s own mapping to ISO/IEC 27002:2022:
{ "Id": "2.6.5", "Title": "Minimer rettigheter på drifts-kontoer", "Category": "Beskytte og opprettholde",
  "Principle": "2.6 Ha kontroll på identiteter og tilganger", "Priority": 1, "InAlert": true,
  "Url": "https://nsm.no/regelverk-og-hjelp/rad-og-anbefalinger/beskytte-og-opprettholde/ha-kontroll-pa-identiteter-og-tilganger/#:~:text=Minimer%20rettigheter%20p%C3%A5%20drifts%2Dkontoer",
  "Related": ["iso-27002-2022:8.2"] }
A test then points at the measures it covers in its Control attribute. Maester resolves the reference, shows NSM’s
title and priority as the test’s benchmark, and adds the ISO controls automatically.
A test #
Every test is a PowerShell function with a [MaesterTest()] attribute. This one is shortened:
function Test-MtNsmPermanentPrivilegedAssignment {
    [MaesterTest(
        Id = 'MP.NSM.1006',
        Title = 'Privilegerte roller er ikke tildelt permanent',
        Product = 'entra', Feature = 'privileged-identity-management', Area = 'privileged-access',
        Severity = 'High',
        Control = ('nsm-gp-ikt:2.6.5', 'nsm-gp-ikt:2.6.4'),
        Service = 'Graph',
        Permission = 'Graph:Scope:RoleManagement.Read.Directory',
        Tag = ('NSM', 'NSM-Identitet')
    )]
    [CmdletBinding()]
    [OutputType([bool])]
    param()

    $privileged = Get-MtNsmPrivilegedRoleId
    $excluded = Get-MtNsmEmergencyAccess
    $assignments = @(Invoke-MtGraphRequest -RelativeUri "roleManagement/directory/roleAssignmentScheduleInstances?`$expand=principal,roleDefinition" -ApiVersion v1.0 |
        Where-Object { $_.assignmentType -eq 'Assigned' -and -not $_.endDateTime })
    $permanent = @($assignments | Where-Object { $_.roleDefinitionId -in $privileged -and $_.principalId -notin $excluded })

    $count = @($permanent.principalId | Select-Object -Unique).Count
    $level = if ($count -le 2) { 'H' } elseif ($count -le 5) { 'M' } else { 'L' }
    Complete-MtNsmResult -Level $level -Summary "$count kontoer har en privilegert rolle permanent, utenom nødtilgangskontoene."
}
Two conventions make the results usable outside Maester:
- The first line of every result is
NSM-vurdering: Høy grad | Moderat grad | Liten grad.Only høy grad passes; moderate and low fail so they show up in the report. The dashboard reads that line from Maester’s JSON. - Break-glass accounts come from Maester’s own
EmergencyAccessAccountssetting, so the NSM checks and Maester’s built-in Conditional Access checks agree on who is excluded.
From control map to tests, with Claude Opus 5.5 #
I didn’t write the 21 tests by hand. I used Claude Opus 5.5 in Claude Code to help me build the pack. It worked from Maester’s own documentation for packs and tests, and from the existing tests in Maester, and adjusted that to what NSM needs: NSM’s scale instead of pass or fail, NSM’s measures as the framework, and Norwegian titles that match NSM’s text. The control map did most of the work: it was the specification. This is the part I’d copy if you want to do the same for your own framework.
-
Start from the map, not from the tests. Each control in the map says which measures and platforms it covers, and whether an API can answer it (
"how": "auto") or an owner has to attest it. Only the automatic controls on Entra ID, Microsoft 365 and Intune became candidates for the pack. The rest stayed in the map as attestations. -
Write one measurement point per control. Before any PowerShell, each automatic control got a short measurement point: the Graph call, the permission it needs, and the rule for each NSM level:
{ "id": "M01", "control": "K01", "domain": "id",
  "title": "Conditional Access krever phishing-resistent autentiseringsstyrke",
  "call": "GET /beta/identity/conditionalAccess/policies (keep policies where grantControls.authenticationStrength is set)",
  "rule": "H: aktivert policy med phishing-resistent styrke for alle brukere og alle apper. M: bare for administratorer eller utvalgte apper, eller i rapportmodus. L: ingen.",
  "permission": "Policy.Read.All" }
This is where the real decisions are made, and they’re yours, not the model’s: what counts as høy grad for your organisation.
To get the calls right, I gave Claude two MCP servers for Microsoft Graph: Merill Fernando’s Lokka and Microsoft’s MCP Server for Enterprise. With both set up for read-only access, Claude could try each call, see the real shape of the response and which permission it needed, and refine the measurement point before writing any PowerShell. Those responses became the mocks in step 5.
-
Let the model turn each point into a test. From the measurement point, an existing Maester test as an example, and the pack conventions, Opus 5.5 wrote the
.ps1and the.md. TheControlattribute comes straight from the map (K03covers 2.6.4 and 2.6.5, so the test saysnsm-gp-ikt:2.6.5,nsm-gp-ikt:2.6.4), and the levels come straight from the rule. -
Generate what must be exact. The framework files and the links to nsm.no are produced by a small script from NSM’s own spreadsheet. The model never types a measure title, priority or URL, so those can’t drift from the source.
-
Check every step. Each test ran offline against mocked Graph responses first, shaped like the ones Lokka and the MCP Server for Enterprise returned.
Test-MtPackran after every change, and I reviewed every rule and every test before it ran against a tenant.
The loop closes in the other direction too. Each result carries its NSM measures (from Control) and its platform
(from a tag like NSM-Identitet), so the import step can put it straight back into the right cell of the control map.
That’s what makes the dashboard possible.
What makes this repeatable is that the map is precise. A model is good at turning a precise specification into code that follows an existing pattern. It’s not the one who should decide what “good enough” means for your organisation. Keep that part, and let the model do the typing.
What the 21 checks cover #
Why 21 checks, when NSM has 118 measures? Because each step narrows it down:
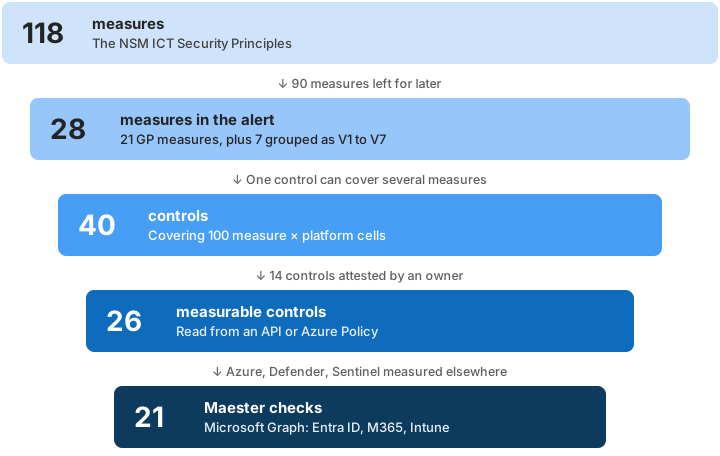
So the pack isn’t meant to cover NSM on its own. It covers 18 of the 100 cells, and the rest come from Azure Policy, other tools and attestations. Extending it to more of the 118 measures is the same work again: map them first, then write checks for the ones an API can answer.
After a run, Maester’s own report gives the operational view: status per test, broken down by severity and by product.
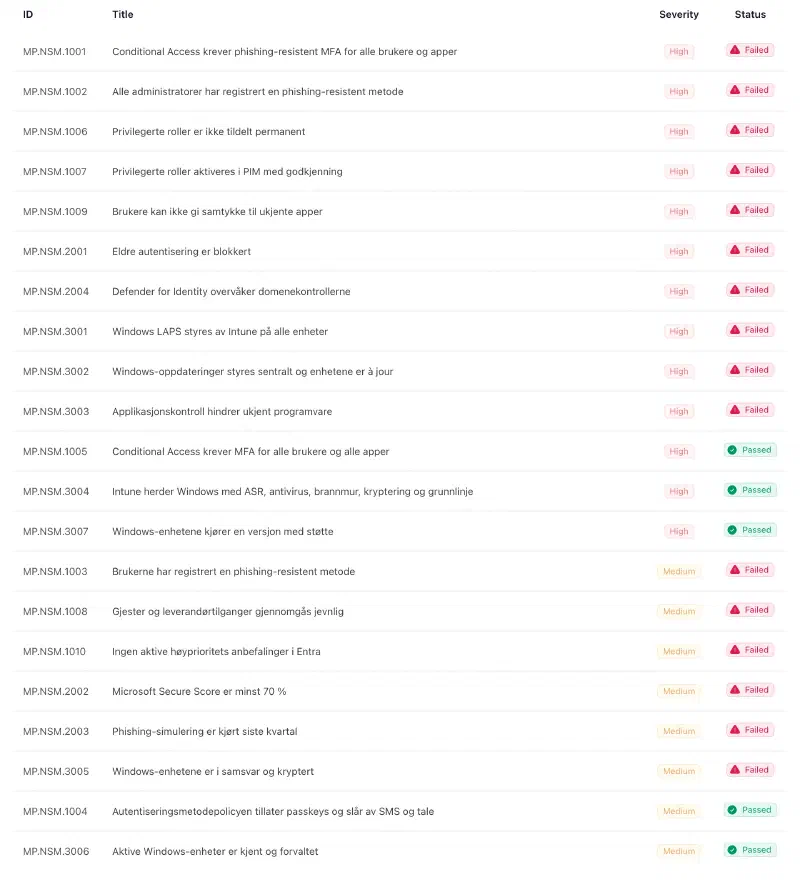
Each check shows up as a test with its ID, the NSM-oriented title, severity and status, so the team fixing things can work straight from the list:
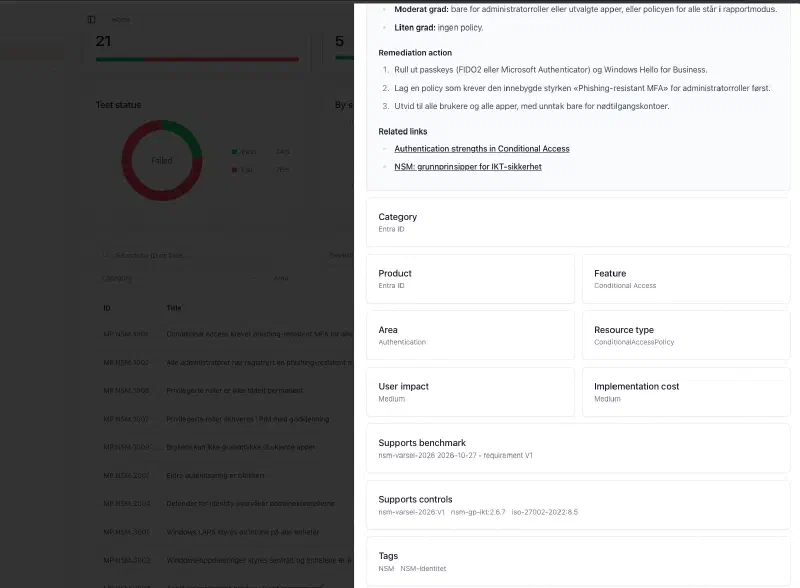
The filters above the list come almost for free. You can search by ID or title, and filter on severity, area,
feature and tag, which come from the [MaesterTest()] attribute, on category, which follows the product, and on
status (passed, failed, investigate, skipped). Because every test has the tag NSM and a platform tag like NSM-Identitet or NSM-Endepunkt, a platform owner can filter to
their own failed checks in two clicks, and the high-severity ones show up first.
Every test’s documentation links to the measure in NSM’s own text. nsm.no has one page per principle and no anchors per measure, so the link uses a text fragment on the measure’s title. It opens the right page and, in most browsers, scrolls to the measure and highlights it.
Checking and installing the pack #
The pack isn’t published to Maester Packs, so these commands run against a local folder:
Test-MtPack ./packs/nsm-gp-ikt                                     # Valid: True, Risk: Low
Install-MtPack ../packs/nsm-gp-ikt -Scope Project                  # from the Maester tests folder
Invoke-MtTest -Path ./packs/nsm-gp-ikt -Id MP.NSM.1006             # run one test from source while developing
My first full version came back as Medium risk. One test invoked a scriptblock with & $build, which the scanner
flags as dynamic code. Inlining it brought the pack back to Low. It’s a nice guard rail: a pack that only reads
Graph should look like one.
Running it #
The pack only needs read permissions, but Invoke-Maester checks for every permission that Maester’s own tests
use, even with -SkipBuiltIn. Since the pack already declares what it needs in its manifest, I read the scopes from
there, sign in, check that they’re in the token, and skip Maester’s own check:
$scopes = (Get-Content ./packs/nsm-gp-ikt/maester-pack.json | ConvertFrom-Json).Uses.GraphScopes
Connect-MgGraph -TenantId '<tenant-id>' -ClientId '<app-id>' -Scopes $scopes -ContextScope Process -NoWelcome

$missing = $scopes | Where-Object { $_ -notin (Get-MgContext).Scopes }
if ($missing) { Write-Warning "Missing: $($missing -join ', ')" }

Invoke-Maester -Pack NSM -SkipBuiltIn -SkipGraphConnect -OutputFolder "./reports/nsm-$(Get-Date -Format yyyyMMdd-HHmmss)"
That way the manifest is the one place that says what the pack may read, and you sign in with nothing more than that.
A full run takes about 15 seconds.
Don’t skip Maester’s own tests #
I use -SkipBuiltIn here to show the NSM pack on its own. In practice, run them together. Maester’s built-in tests
are very good and cover far more than 21 checks. The NSM pack doesn’t replace them. It adds NSM’s measures and NSM’s
scale on top.
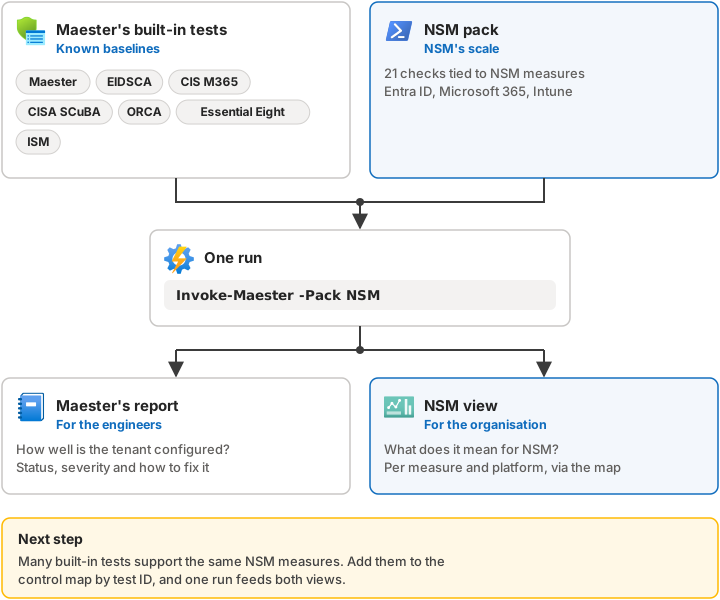
Invoke-Maester -Pack NSM -OutputFolder "./reports/maester-nsm-$(Get-Date -Format yyyyMMdd-HHmmss)"The combination is the point. The built-in tests tell the engineers how well the tenant is configured against well-known baselines, and the NSM pack tells the organisation what that means for the framework it answers to.
Building your own dashboard #
The dashboard itself isn’t the point of this post. How it looks, where it runs and what it connects to will be different in every organisation, and many already have a GRC tool, Power BI or a portal it should live in. What matters is why you need a view on top of Maester at all.
Maester’s HTML report is written for the people who fix things: a list of tests, each with its status, details and remediation. That’s the right view for an engineer. The people who own the risk ask different questions, and they need a different view:
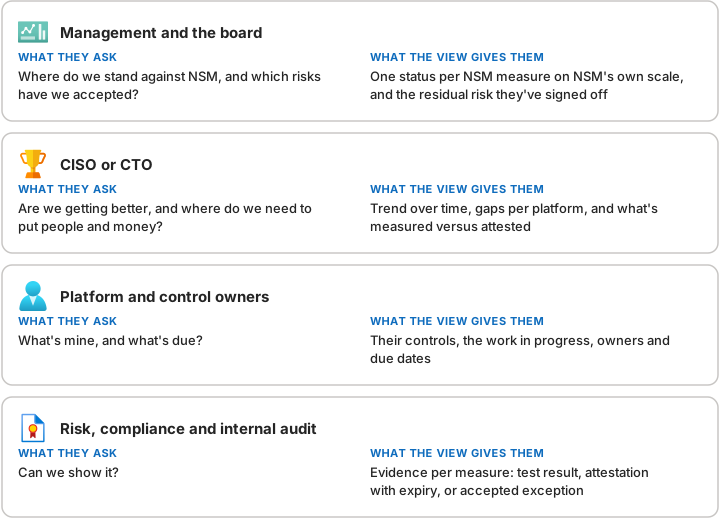
None of them want 21 test results. They want one row per NSM measure, one column per platform, and a colour per cell, plus the context the checks can’t give: who owns it, what’s being done, and what’s been accepted. That’s why ours is internal. It holds plans, owners and accepted risk, which don’t belong in a report you pass around.
Nothing in it is hard, and I’d encourage you to build one in whatever tool your organisation already uses. You need four things:
- An import step that reads Maester’s JSON and keeps only what the view needs: test, NSM level, measures, platform and the summary line. Token scopes, account names and result tables stay in Maester’s own report, so the view can be shared more widely than the report.
- The control map as data, so the view knows which cells are relevant and which controls belong to each.
- One rule for combining results: each measure-and-platform cell takes the worst level among the checks that cover it. Cells that no check measures show as “not assessed”, never as green. That honesty is what makes management trust the green cells.
- A register of work in progress: plan, owner, due date, and exceptions or accepted risk per measure and platform. It’s what tells a gap that’s being closed apart from a gap nobody owns.
The same idea in Azure Policy #
Entra ID, Microsoft 365 and Intune live in Microsoft Graph, which is why Maester fits them. Azure resources are a better fit for Azure Policy, and the same mapping works there: a custom policy initiative for the NSM ICT Security Principles, with each policy grouped under the NSM measure it supports. Defender for Cloud can then show the initiative in its regulatory compliance dashboard, next to built-in standards like ISO 27001 and CIS.
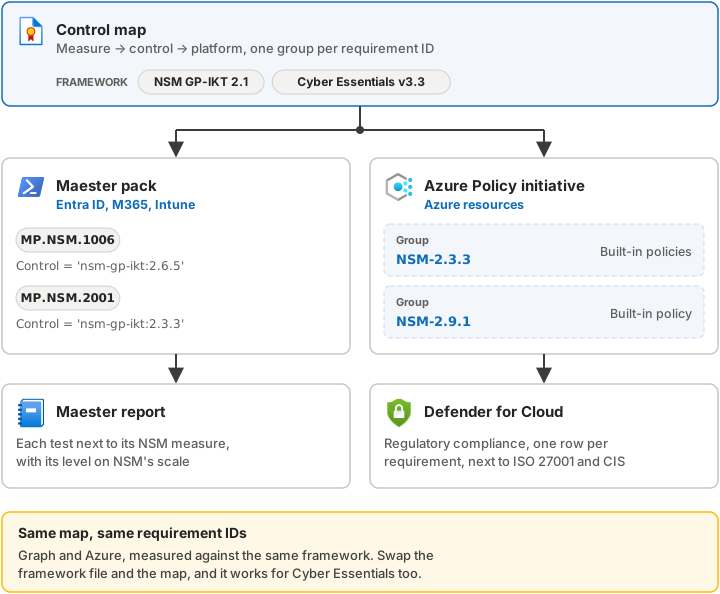
The trick is the same as with the Maester pack: group the checks by the framework’s own requirement IDs. In an
initiative, that’s policyDefinitionGroups, one group per measure, and each policy points to the groups it supports
with groupNames. The initiative’s metadata category is Regulatory Compliance:
"metadata": { "category": "Regulatory Compliance" },
"policyDefinitionGroups": [
  { "name": "NSM-2.3.3", "category": "Beskytte og opprettholde", "displayName": "2.3.3 Deaktiver unødvendig funksjonalitet" },
  { "name": "NSM-2.9.1", "category": "Beskytte og opprettholde", "displayName": "2.9.1 Legg en plan for regelmessig sikkerhetskopiering av alle virksomhetsdata" }
],
"policyDefinitions": [
  { "policyDefinitionId": "/providers/Microsoft.Authorization/policyDefinitions/<built-in-id>",
    "groupNames": ["NSM-2.3.3"] }
]
The control map tells you which groups to create: every measure with az as a platform gets a group, and every
control that Azure Policy can measure becomes one or more policy definitions in it. The pack and the initiative are
two views of the same map.
I’ve built the same thing for Cyber Essentials v3.3. Azure ships a built-in initiative, but it’s “Cyber Essentials v3.1”, two versions behind the current NCSC requirements. So I built a custom initiative aligned to v3.3, with one group per requirement, and reused the built-in policy definitions wherever they still fit. Because it’s structured the same way, you can map it into your own initiatives, or combine it with an NSM initiative if you answer to both. A built-in initiative is a good starting point, but check which version of the framework it actually follows.
Note that Defender for Cloud now calls this route a legacy feature and points to its newer custom standards. The grouping idea is the same either way.
Combined with a Maester pack for the Graph side, an organisation gets measured coverage across both the Microsoft 365 and the Azure part of its estate, mapped to the same framework, whether that’s NSM or Cyber Essentials.
Things that tripped me up #
Invoke-MtGraphRequest -DisablePagingreturns the raw response. The results are undervalue. My Secure Score checks read the wrong object and skipped themselves on the first run.- Keep OData query options out of the URL string. A nested
$expand=policy($expand=rules)written intoRelativeUrididn’t survive Maester’s query rebuilding. Passing it with-Filterand-QueryParametersworks. - Mock before you run. I ran every test offline against Graph responses shaped like real data before touching a tenant. That caught the logic errors without a sign-in per attempt. Getting the real shape first, with Lokka and the MCP Server for Enterprise, is what made the mocks trustworthy.
A good place to start #
You don’t have to build the whole thing from scratch. Maester itself is now available as ready-to-deploy solutions on Microsoft Marketplace:
- Maester my Microsoft 365 from my employer, Fortytwo (product page, Marketplace listing). It runs in your own tenant and combines Maester’s tests with Microsoft’s Tenant Configuration Management (TCM) APIs in Microsoft Graph (often called UTCM), so you get historical tracking and alerts on configuration drift across Entra ID and Microsoft 365. That history is exactly what a trend view on NSM’s scale needs.
- Maester Cloud (Marketplace listing), which turns Maester and Zero Trust Assessment runs into an evidence trail over time. It was featured in Merill Fernando’s Entra.News #173 on 1 November 2026, together with the Azure Marketplace option.
Either one gives you scheduled runs and history. Add a framework pack like the one in this post, and you have the foundation for tracking NSM’s principles over time.
Could this be how you track NSM’s principles? #
I think so. The tooling matters less than the routine around it. This is the way of working I’d suggest:
- Own the map. Agree on the control map with the people who run each platform. Each control gets an owner.
- Measure what an API can answer. Run the Maester pack on a schedule, for example weekly from a pipeline with a read-only app registration.
- Attest the rest. Network, OT and governance measures get an owner, evidence and an expiry date, in the same view as the measured ones.
- Report on NSM’s scale. Høy, moderat and liten grad, per measure and platform, so the result lines up with NSM’s own risk assessment template.
- Sign off residual risk. Management accepts what isn’t at høy grad, with a date for when it’s reviewed again.
When NSM raises the risk level again, or publishes a new alert, you’re not starting from a blank spreadsheet. You already know where you stand, measure by measure.
What’s next #
So far I’ve only covered the 28 measures in NSM’s alert. The next step is the other 90, using the same method:
- Map the rest of the 118 measures. For each measure, decide which platforms it applies to, which control implements it on each one, and whether an API can answer it or an owner has to attest it. The build already fails on gaps, so the map tells me when it’s complete.
- Write more checks where an API can answer. For each new control that Microsoft Graph can answer, write a
measurement point with the call, the permission and the rule for høy, moderat and liten grad, turn it into a test
with its
Controlreference, and release a new version of the pack afterTest-MtPackpasses.
The result is the same pack and the same map, just covering more of NSM’s principles.
Not just NSM #
Nothing here is specific to NSM. Swap the framework file and the control map, and the same approach works for other frameworks. I’m doing that with another customer right now for Cyber Essentials v3.3, on top of the Azure Policy initiative above. More on that in a later post.
For Norwegian organisations, NSM’s principles are a good place to start. With a control map, a pack like this and a simple view on top, an organisation can turn them into something it measures every week, in the language NSM already uses.
Let’s talk #
This is still work in progress, and I’m learning as I go.
I’m curious how others do this. How do you keep track of NSM’s principles, or another framework, today?
If this sounds useful for your organisation, ping me on LinkedIn or X/Twitter (@salvestad).